


This document describes the key concepts of the tiny workflow API.
TinyWorkflow is a java API allowing to attach workflows to java objects. 'Workflow' is a quite generic term used with different meanings depending on the context of use. In this document we use workflow as synonyms of Finite State Machine. These workflows are usually represented by a State-Transitions UML diagram. See InTheWorld.html to have more information about the place of TinyWorkflow in the workflow world.
The aim of using TinyWorkflow is to externalize the 'workflow behavior' of your java object outside java code (into a XML definition). The advantages of doing that are:
Let's describe the key concept of TinyWorkflow with an example.
Suppose you have a java document object (of class com.myCompany.Document) and you want to associate it to the very simple workflow as defined in diagram 1:

The first thing to do is to write a XML workflow definition. The XML workflow definition is a XML file describing the workflow. The mapping between a state machine and the XML workflow definition is straightforward.
Main XML elements are:
This gives you an overview of the XML workflow definition structure. Of course, a lot of other tags are available. See the complete workflow definition documentation for more details: Workflow XML Reference.
So the XML corresponding to the simple document workflow definition will look like:
<?xml version="1.0" encoding="ISO-8859-1" ?>
<workflow xmlns="http://org.tinyWorkflow/2005/WorkflowDefinition"
          id="exampleDoc" version="1.0"
          peer="com.myCompany.Document"
          name="Example document workflow">

    <initialTransitions>
        <transition id="create">...</transition>
    </initialTransitions>

    <states>

        <state id="Draft">
        <transitions>
                <transition id="edit">...</transition>
                <transition id="approve">...</transition>
                <transition id="delete">...</transition>
        </transitions>
        </state>

        <state id="Approved">
        <transitions>
                <transition id="publish">...</transition>
                <transition id="delete">...</transition>
        </transitions>
        </state>

        <endState id="Published">
      </endState>

        <endState id="Deleted">
        </endState>

    </states>

</workflow>
Example 1: XML workflow definition structure
Todo: provide complete example file as link.
This XML definition will be loaded by the tinyWorkflow API as a WorkflowDefinition object and stored in a WorkflowDefinitionRepository.
The WorkflowDefinition object is the object representing the workflow definition XML as a java object. It has the same structure as the XML (The WorkflowDefinition object will contain StateDefinition objects just as <workflow> xml element contains <state> elements. And so on ...)
The WorkflowDefinitionRepository is a java object storing all workflow definition. As workflow definitions are stateless they will be shared between all the workflow instances.
Loading a definition to a repository is as simple as the following:
WorkflowDefinitionRepository repo = WorkflowDefinitionRepository.getInstance();
repo.addXmlDefinition(getClass().getResource("ExampleDoc.xml"));
Example 2: Loading a workflow definition
Workflows definitions can be loaded from URL (as in the previous example) from file or from steams.
Before to be able to start a workflow you will need to specify how workflows will be persisted (loaded and saved to something like a database). All the persistence-related operations of the TinyWorkflow are realized by a pluggable class implementing the org.tinyWorkflow.persistence.WorkflowPersistence interface. Depending of the actual implementation used, you will have different types of persistence.
For the moment 2 implementations are available:
Each workflow instance is attached to one persistence. The same persistence can manage more than one workflow. It depends how transactions are managed. Usually all the workflows modified in the same transaction will share the same persistence (as it's the persistence that manages transactions).
To really abstract the persistence manipulation, TinyWorkflow provides an abstract factory able to create persistence objects. With this factory, the TinyWorkflow framework is able to create automatically persistence objects.
The workflowPersistence object also encapsulates transaction management. Allowing to start/commit transactions transparently (mapped to database transactions with hibernate persistence and to nothing with memory persistence). Note that, in general, the workflow API doesn't manage the transactions. They are supposed to be controlled by external code.
Here is an example on how to build a Hibernate persistence factory and setting it as repository persistence factory (so all workflows will use a hibernate persistence).
Configuration config = new configuration();
SessionFactory factory = config.buildSessionFactory();
HibernatePersistenceFactory factory=new HibernatePersistenceFactory(factory);
repo.setPersistenceFactory(factory);
Example 3: Setting up a hibernate persistence factory
The two first lines are pure hibernate. Once you have the Hibernate session factory, you can build the HibernatePersistenceFactory and set it as repository persistence factory.
Once you have a definition of a workflow you want to start instances of the workflow and attach these instances to java objects (in the example to Document objects).
Each instance of the workflow is linked to one object called workflow peer. The workflow peer must implement the org.tinyWorkflow.instance.WorkflowPeer interface. The usual way to link a workflow to a peer is simply to put the peer class name in the workflow definition (as in the XML definition example). Then the workflow API will create an instance of that class for each newly started workflow.
To create a new workflow (starting from repository of example 3)
Workflow wf = repo.createWorkflowInstance("exampleDoc", null);
wf.doTransition("create", null, "someUserId");
Example 4: Creating a workflow instance
This code creates the workflow instance and run the 'create' initial transition on it. So now the workflow is in the 'Draft' state. A document object has been created and is associated to the workflow, you can get if simply from the workflow:
Document peer = (Document)wf.getPeer();
Example 5: Getting the workflow peer
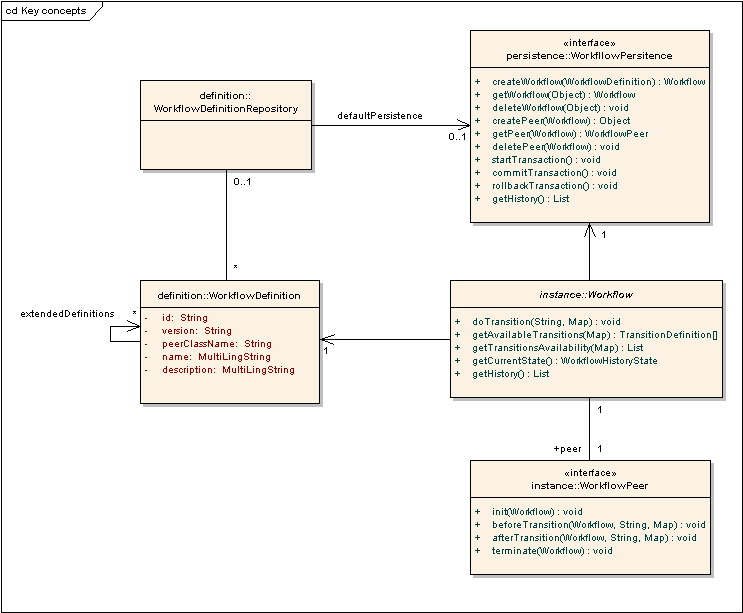
The concepts defined in this document are the base of the TinyWorkflow core. They are inter-related as shown in the following diagram:
Of course the TinyWorkflow API is more than that !
In other documents you will find
TODO: list of all available documents
About definitions:
About instance:
About persistence:
In addition to the TinyWorkflow Core, the TinyWorkflow API also offers extensions: